
Learning how to tie a tie or how to tie a bowtie that comes with your tuxedo is pretty daunting. Thankfully there is always the good old necktie to fall back on. You’ve been dying to learn how to tie a windsor knot for ages now. But instead, you just pull out the same old schoolboy knot you’ve used for every job interview you’ve had since you were fourteen. It’s gotten you this far, right?
Think again.
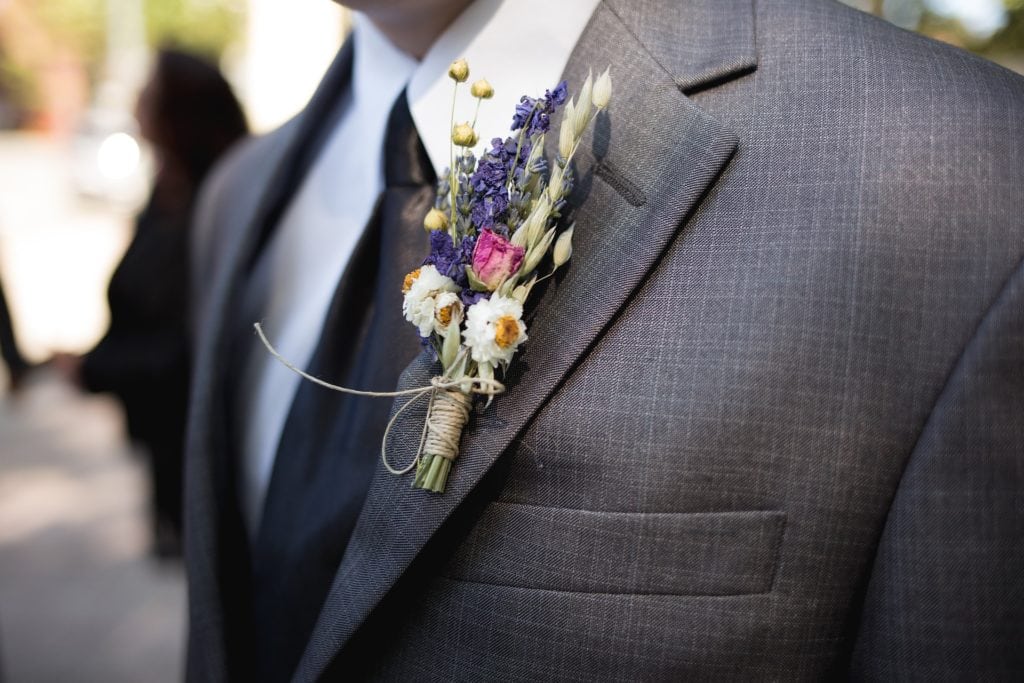
Whether it is for your rehearsal dinner or you and the bride have opted for a suit wedding, you are going to want the perfect literal knot for when you’re tying the metaphorical knot. You need to choose the knot that is right for your collar, your tie, your body, and the occasion. But before you can know that, you need to figure out your options. These knots, from simple standards to modern marvels, will cover all your bases.
How To Tie A (Full/Double) Windsor Knot
This is the classic. The knot your father ties. Some people call it a Full or Double Windsor, but if you know what you’re talking about you know it is just the Windsor Knot. A big, bold, symmetrical knot.
- Hang the tie around your collar, with the wide end to your right and the narrow end to your left.
- Cross the wide end over the narrow end, to your left.
- Bring the wide end up behind the neck loop.
- Bring the wide end back down front to your left.
- Cross the wide end behind the narrow end, so that the backside of the wide end is facing out.
- Bring the wide end back up to your collar, keeping to the right of the narrow end.
- Loop the wide end behind the neck loop and back down to the right, so that the backside of the wide end is facing out again.
- Cross the wide end back over the narrow end to your left.
- Bring the wide end back up behind the neck loop, keeping to the left of the narrow end.
- Bring the wide end back down through the new loop you have created in front of the narrow end.
- Pull the wide end down to tighten the knot into place. Adjust the knot accordingly to center it in your collar.
How To Tie A Half Windsor Knot

Sometimes you don’t need something as bold and wide as the Windsor. The Half Windsor offers a slightly smaller knot that trades formality for versatility. Its signature dimple in front is always a classy touch.
- Hang the tie around your collar, with the wide end to your right and the narrow end to your left.
- Cross the wide end over the narrow end, to your left.
- Cross the wide end behind the narrow end to your right, so that the backside of the wide end is facing out.
- Bring the wide end up to your collar.
- Loop the wide end behind the neck loop and back down to the left, so that the backside of the wide end is facing out again.
- Cross the wide end back over the narrow end to your right.
- Bring the wide end back up behind the neck loop, keeping to the left of the narrow end.
- Bring the wide end back down through the new loop you have created in front of the narrow end.
- Pull the wide end down to tighten the knot into place. Adjust the knot accordingly to center it in your collar.
How To Tie A Four-in-Hand Knot
 This is your good old schoolboy knot. Super easy to tie, creating a more slender and slightly asymmetrical knot than the Windsors.
- Hang the tie around your collar, with the wide end to your right and the narrow end to your left.
- Cross the wide end over the narrow end, to your left.
- Cross the wide end behind the narrow end to your right, so that the backside of the wide end is facing out.
- Cross the wide end back over the narrow end to your left.
- Bring the wide end back up behind the neck loop.
- Bring the wide end back down through the new loop you have just created in front of the narrow end.
- Pull the wide end down to tighten the knot into place. Adjust the knot accordingly to center it in your collar.
How To Tie A Pratt (Shelby) Knot
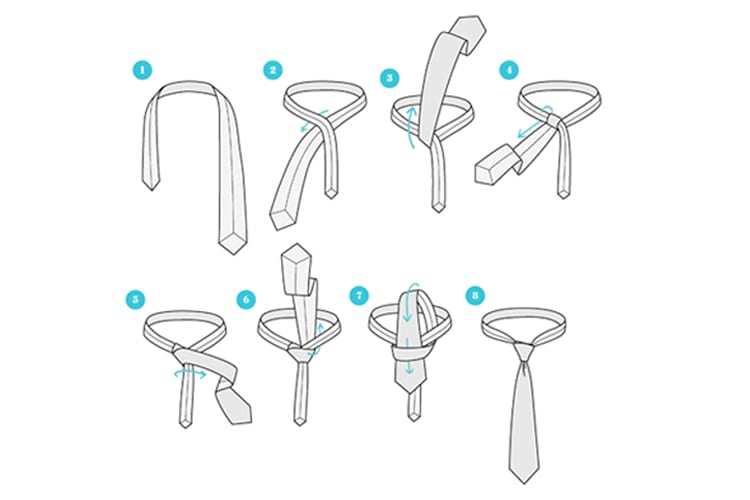
For a more creative but still dignified knot, the Pratt Knot strikes a fantastic balance in both style and size between Four-in-the-Hand and the Half Windsor.
- Hang the tie around your collar with the backside facing forward, the wide end to your right and the narrow end to your left.
- Cross the wide end under the narrow end, to your left.
- Bring the wide end up to your collar, keeping to the left of the narrow end.
- Bring the wide end down through the neck loop and back to your left, so that the back of the wide end is facing out again.
- Cross the wide end over the narrow end to your right.
- Bring the wide end back up to your collar, underneath the neck loop.
- Bring the wide end back down through the new loop that you have just created in front of the narrow end.
- Pull the wide end down to tighten the knot into place. Adjust the knot accordingly to center it in your collar.
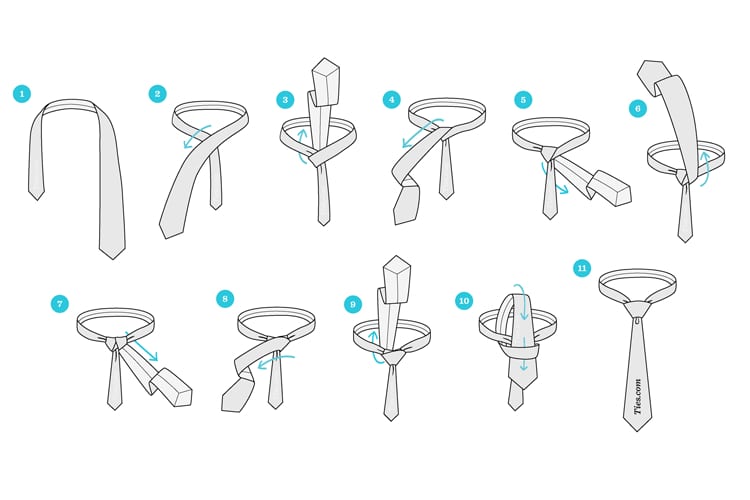
How To Tie A Balthus Knot
A behemoth of a knot, for when the Full Windsor just isn’t big and bold enough for you. A bit eccentric, but when pulled off properly it is a strong, impressive knot. Word to the wise: the Balthus requires folding the wide end more than any other knot, so make sure you give yourself more length on the wide end than you usually would.
- Hang the tie around your collar with the backside facing forward, the wide end to your right and the narrow end to your left.
- Cross the wide end under the narrow end, to your left.
- Bring the wide end up to your collar.
- Bring the wide end back behind the neck loop, to your right, so that the back of the wide end is facing front again.
- Bring the wide end back up to your collar.
- Bring the wide end back behind the neck loop, to your left, with the back of the wide end is again facing front..
- Bring the wide end back up to your collar.
- Bring the wide end back behind the neck loop, to your right, so that the back of the wide end once again faces the front.
- Cross the wide end back over the narrow end to your left.
- Bring the wide end back up under the neck loop.
- Bring the wide end back down through the new loop that you have just created in front of the narrow end.
- Pull the wide end down to tighten the knot into place. Adjust the knot accordingly to center it in your collar.
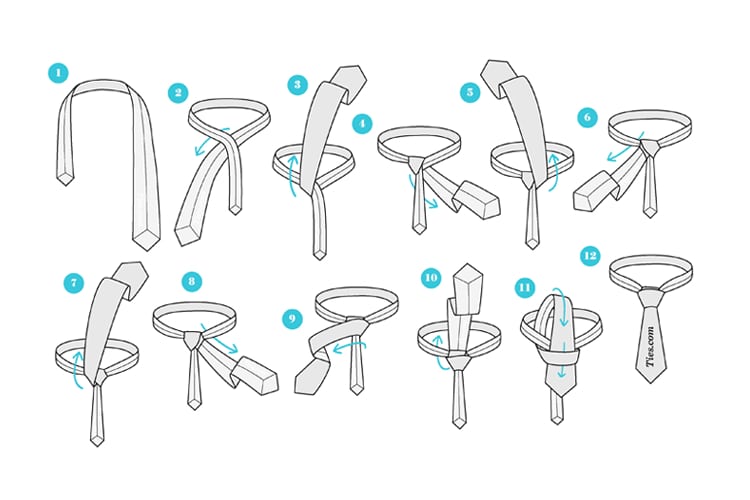
How To Tie A Trinity Knot

A newer knot with a strong resemblance to a traditional Celtic knot. While it can be difficult to get all three sides perfectly balanced, a successfully executed Trinity Knot is a large, round knot that certainly stands out in a crowd.
- Hang the tie around your collar, the wide end to your left and the narrow end to your right.
- Cross the narrow end over the wide end, to your left.
- Bring the narrow end up behind the neck loop, keeping to the left of the wide end.
- Bring the narrow end back down to your left.
- Cross the narrow end behind the wide end, to your right.
- Bring the narrow end up to your collar.
- Bring the narrow end through the neck loop and behind to your left.
- Cross the narrow end over the wide end, to your right.
- Bring the narrow end back up behind the neck loop.
- Bring the narrow end back down through the new loop that you have just created in front of the wide end. Keep the knot loose.
- Bring the narrow end back behind the wide end, to your right.
- Bring the narrow end back up and through the loop created in Step 10.
- Tighten the knot into place and tuck any remaining bit of the narrow end behind the neck loop to your left.
How To Tie An Elderidge Knot
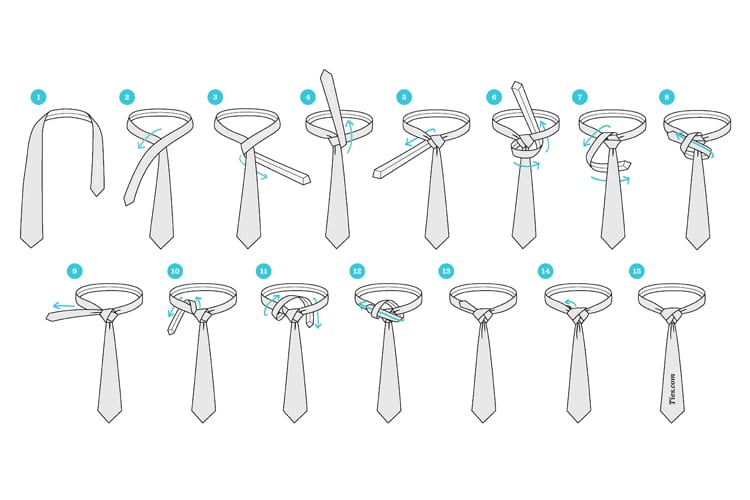
One step beyond the Trinity Knot in both complexity and spectacle is the Elderidge Knot. Large, unconventional, and showcasing an artistic, threaded texture, this is not for formal occasions or everyday use. But when you want to show-off, it is the red sportscar of tie knots.
- Hang the tie around your collar, the wide end to your left and the narrow end to your right.
- Cross the narrow end over the wide end, to your left.
- Cross the narrow end behind the wide end, to your right.
- Bring the narrow end up to your collar, in front of the neck loop.
- Bring the narrow end down behind the neck loop, to your left.
- Cross the narrow end over the wide end, to your right.
- Bring the narrow end up behind the neck loop.
- Bring the narrow end down over the neck loop to your left and then behind the wide end to your right. Keep this part loose.
- Bring the narrow end over the wide end and through the loose loop you created in Step 8. Pull the narrow end to your left and tighten the knot.
- Bring the narrow end up and behind the neck loop to your left.
- Bring the narrow end up and over the neck loop to your right and under the neck loop on the other side of the knot. Keep this new loop to the left of the knot loose.
- Bring the narrow end over the wide end to your left and up through the loop you created in Step 11.
- Tighten the knot into place and tuck any remaining bit of the narrow end behind to neck loop to your left.
How To Decide What Knot To Tie
Tying the tie is only half the battle. The trickiest step can often be the first one: What knot should you use when? As long as you consider these four factors, the decision should be easy.
Collar Type:
A wide spread collar is going to demand a larger knot, like a Windsor, Elderidge, or even Balthus. Pointed collars and button-down collars need a smaller knot, like a Four-in-the-Hand, Half-Windsor, or Pratt. Ultimately you want a knot that fills up the entire space in your collar without overwhelming it.
Tie Size:
Wider ties look better with bigger knots, while skinny ties look better with smaller knots. Similarly, thicker fabrics are nicely paired with big knots while thinner material like silk are best tied with a small knot.
Face and Body Proportions:
The size of your tie knot should look natural with the your body and your face. Larger men do well with larger knots, while if you’re slender your tie should be as well. Conversely, your collar and tie should balance out your face shape. If you have a rounder face, go with a narrow, pointed collar and small knot. Longer, more angular faces will be best paired with a wider collar and a larger knot.
Formality:
The Windsor will always be the king of formality, perfect for a wedding but out of place at the bachelor party. The Half-Windsor is an acceptable knot for a formal occasion if you need a smaller knot than the Windsor. Fancier knots, like the Trinity and Elderidge, are best for semi-formal settings, while Four-in-the-Hand is the perfect “casual” knot.
You don’t want to be caught wearing the wrong knot. Know your options, learn how to use them, and develop a secret weapon knot you pull out when it’s time to show off.